The Portabella Mushroom Burger with Dijon Honey Mustard Glaze

The Portabella Mushroom Burger (With Honey Mustard Glaze & Swiss Cheese)

Portabello Mushroom Burger (1)

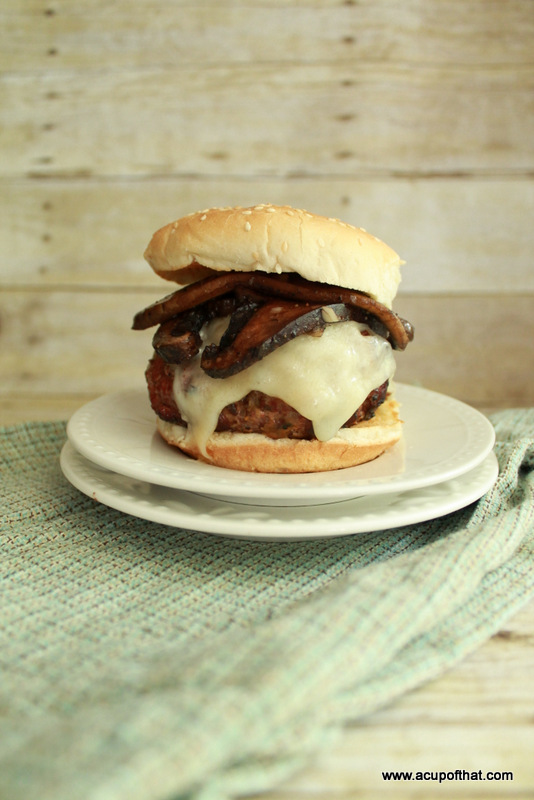
There are times when I feel like dressing up a good old-fashioned cheeseburger with things other than ketchup, mustard, lettuce and tomato.  You know, taking that backyard grilled burger to a whole new level – to the restaurant quality level.  What better way to achieve that than by basting those burgers with a homemade Dijon Honey Mustard Glaze as they cook, melting some Swiss cheese atop them and covering them in simmering hot garlic flavored Portabella Mushrooms?  I can’t think of a better way.

Garlic & Mushrooms

So, a pickle or some chips would have probably sufficed as a side dish for this monster of a burger.  I almost finished an entire burger, but stopped after there was about another two bites remaining because I was so full already.  Heck, I was probably feeling full after half of this burger, but kept eating because it tasted so darn good.  There aren’t many foods that can do that to me.  I usually never eat to the point of feeling over-full.


Maybe it was just me, but I felt like the burger became more flavorful with every bite.  It was seasoned perfectly after having been basted with a honey mustard glaze as it grilled and the addition of the giant slices of garlic seasoned Portabella Mushrooms sent this burger into my all-time favorite backyard burger land.  Seriously, I think this burger deserves the Backyard Burger of the month award, if there were such a thing.  Maybe I should start a little blog series on that for the summer months.

Mushroom & Garlic

I enjoyed taking the photographs of the ingredients this time around since the mushrooms were so large and beautiful.  The photo above was taken before I sliced them into thinner pieces, and I’m glad I did since the burgers were hard enough to bite because they were monstrous in size!

Sauted Portabella Mushrooms

Perhaps many would have cleaned up the edges of the interior portion of the pan shows all the bits of minced garlic and the remnants of olive oil, but I preferred a more natural appearance this time.  After all, it was made here at home and I don’t always prefer perfection.  Sometimes the messiness is interesting.

We can get to the recipe stuff now.

Ingredients (makes 5 large burgers):

Burgers

  • 5 slices Swiss cheese
  • 3-4 lbs ground beef (lean)
  • salt & pepper to taste
  • 1 piece of white bread, torn up into small bits
  • hamburger buns (your choice)

Honey Dijon Glaze:

  • 1/4 cup Dijon mustard
  • 3 tablespoons soy sauce
  • 3 tablespoons honey

Portabella Mushroom Topping:

  • 3 cloves garlic, minced
  • 1 tablespoon olive oil
  • 3 tsp thyme

Directions:

For the glaze, add all ingredients to a small bowl and mix well.

Add raw beef to a big bowl, sprinkle in some salt and pepper and the bits of torn pieces of bread and patty up 5-6 medium-large hamburger patties.  Grill to your liking, depending on how well you like your burgers done.  Baste with Honey Dijon Glaze as the burgers cook on both sides, but do not start this basting process until both sides are cook on the outside of the burger.  Add Swiss cheese to burgers when they are nearly done to give that cheese time to melt over that monster burger.

In the meantime, heat olive oil in a saucepan/frying pan over medium heat.  Saute mushrooms until nearly tender and add garlic.  Saute for another few minutes to combine flavor.  Place these garlicky mushrooms atop your burger and enjoy!

Portabello Mushroom Burger (3)

Although there are three different things you have to prepare to get one complete burger, it’s well worth it.  Each process doesn’t take long so I would say that in total we probably spent about 35-45 minutes total on everything before we were ready to dig in. It helped that after the burger patties were ready Ryan took care of the grilling and basting portion of the deal while I was inside preparing the mushrooms.  So, if you have another person around who can handle the grilling portion, you can save time there.

Well, I hope those of you from America are enjoying Independence Day.  I think it’s time for us to figure out where we can catch some fireworks now.  (I know, we waited until last-minute to figure it out!)

Thanks for stopping by and don’t forget to cook, bake and eat life up!

Grilled Steak & Onion String Salad

I said I was in the mood for fresh before right?  We had a beast of a salad today.  I could have gone a little crazier with the additions, but I had to stop myself.  I’ll have a salad please is something I don’t often say, that is if I want an entire, filling meal…but this salad had enough in it to fill me right up.  We had this deliciously beautiful thing for lunch today.

gilled steak salad (2)

Grilled Steak Salad

So I wanted to add some onions and something with a bit of a crunchy texture, but I don’t always like raw strands of onion in my salad…so I did something a little different with the onions to incorporate both the onion and the crunchiness I was looking for.  I battered them, seasoned them with a little black pepper, paprika and bacon salt (which makes everything taste like bacon – I know, right!).  They were absolutely amazing and worked so well with this salad.  It’s sort of like having bacon bits in your salad, only it’s a bacon-flavored battered strand of onion.

grilled steak salad (2)

Grilled Steak Salad

I set separate bowls of the different additions out across the table because we all like different things in our salads.  For example, I love hard-boiled eggs in mine, but Ryan can’t stand hard-boiled eggs.  My daughter absolutely loves steak and tomatoes, so her salad consisted mainly of greens, steak and tomatoes.  Also, there’s a better chance food doesn’t get wasted this way because the kids will pick out what they like and throw what they don’t like out.

grilled steak salad (5)

Grilled Steak Salad

Ingredients (for salad, serves 4-6):

  • Sirloin Tip Steak (Thin)
  • 2 tablespoons soy sauce
  • 2 tablespoons lemon juice
  • black pepper
  • 3 eggs (hard-boiled and sliced)
  • cherry tomatoes
  • spring mix organic salad (baby spinach, red and green romaine lettuce, red and green oak leaf, red and green chard, arugula)
steak salad

Grilled Steak Salad


Ingredients (for Onion Strings):

    • 2 tablespoons bacon salt
    • 1 tablespoon paprika
    • 1 cup vegetable oil
    • 1 cup buttermilk

Directions:

  1. Cut steak into strips and add them to a bowl with soy sauce and lemon juice.  Sprinkle in a bit of pepper (the amount is up to you).  Let it sit 10 minutes to marinade a bit.  Using a stove-top grill pan, a George Foreman Grill, or just a regular frying pan with a bit of oil, fry these up for as long or as little as you would like.  I like mine well-done since the kids eat this (we don’t need to risk getting Listeria).
  2. In a small pot, add water and eggs over medium high heat and bring to a somewhat rapid boil.  Cook eggs for 17 minutes to hard-boil them.  Remove, cool, peel and slice when ready.
  3. In the meantime, prepare your onion strings.  Heat oil in a frying pan over medium heat.  Slice up an onion into rings and then cut those rings in half or on one side to create half moons or a strand of onion.  Place onions in a bowl of buttermilk until oil is hot.  In another small bowl add flour, paprika and bacon salt and stir.  Dip onions in flour mixture and stir to coat just before frying.  Fry until browned and crispy.  Remove and set in a bowl or on a plate with a napkin to cool.
  4. Add all of these goodies to your bowl of salad and eat!
steak salad (3)

Grilled Steak Salad

Some green onions would have been another excellent addition to this salad as well.  The good news is that you can add whatever it is your heart desires to your own salad.  Salads are so versatile.  Just another reason to love salad. 😉

Thanks for stopping by ladies and gents!  Have a great day!

Onion Straws

Bacon Flavored Onion Strings


Shepherd’s Pie, An Irish-American Version

Shepherd's Pie (5)

Shepherd’s Pie – Irish/American Version

About ten years or so ago, I threw together a type of casserole of sorts that included some of my favorite side dishes layered with ground beef.  I loved it.

As I mentioned in a previous post, I love food with layers and often eat separate parts of a meal in one bite, picking a little of each side up with the fork for a complete bite of everything.  Side dishes are usually made because each addition compliments the overall meal in some way, and I love tasting all of those flavors together.

So, when I made this dish some years ago, I was in layered food flavor Heaven.  I couldn’t get enough of this stuff.  Often times I change-up the recipe a bit and I’ve added some things specifically because my kids eat it up with those modifications.

Unbeknownst to me, the dish I had made was very similar to a traditional Irish dish called Shepherd’s Pie.  I hadn’t even heard of it before; Not until we had a dinner guest over who said, “This is a lot like Shepherd’s Pie”.  After some research, lo and behold, it was very similar, but you can say that I have taken that traditional Irish version and Americanized it a bit.

Shepherd's Pie

Shepherd’s Pie, An Irish/American Version

Now, being as how my last name is of Irish decent, meaning plenty of my Ancestors were straight from Ireland, you would think I would have known about this dish.  However, so much time has passed that many of us don’t know everything about the authentic dishes enjoyed by our ancestors.

I like to think that it was some internal part of me, related to my ancestry, that beckoned me to create such a dish without the knowledge of its prior existence and formulation.  Perhaps this is why I love this dish so much, especially with the Americanized modifications I have made and continue to make.

Such as the addition of cheese for example.  Now, no one really knows when, how, who or where cheese-making began, but what we do know is that cheese, in general, and cheese-making, became BIG Business in America during the 19th century (putting Wisconsin on the map).  Although cheese is loved by many and used in dishes all over the world, I tend to think of our big American brands when I think of cheese, which is why I say this is sort of a reinvention of the traditional Irish version of this dish because it has some American flair (or components).

Another addition that I consider more American is the corn.  The traditional Irish dish uses carrots. Now, my home state is Indiana.  Indiana Beach has this commercial that has a big cartoon Crow stating, “There’s more than corn in Indiana.”  Of course, their “more than corn in Indiana” means that there’s also Indiana Beach, but we can’t deny that while traveling through Indiana, the scenery will include a lot of cornfields.  So, there is more than corn in Indiana.  There’s Indiana Beach and my Shepherd’s Pie with corn.

Shepherd's Pie (6)

Shepherd’s Pie, An Irish/American Version

Ingredients (serves 6):

  • 1-2 lbs ground beef
  • 1 tablespoon Worcestershire sauce
  • 2 cloves garlic (minced)
  • 1 small onion, diced
  • 8 russet potatoes, peeled and mashed
  • 1 small bag frozen peas (or two cans)
  • 1 small bag frozen corn (or two cans)
  • 2 cups of cheese (I used the Kraft fancy blend of mozzarella and cheddar)
  • salt and pepper to taste
  • 1/2 stick butter for potatoes
  • 1 cup milk for potatoes

Directions:

  1. Fill a large pot halfway full of water and bring to a boil (over medium to medium-high heat). Peel potatoes and cut them smaller chunks.  Add to pot of boiling water and cook until tender (about 25 minutes).  Drain and mash the potatoes with potato masher when cooked and add butter and milk. Stir until blended and creamy. Set aside until beef is done.
  2. In the meantime, preheat oven to 375 degrees F.
  3. Brown beef in a skillet or frying pan.  Add chopped onions and minced garlic to beef as it cooks.  Add Worcester sauce to help flavor the beef. Drain excess oil from beef mixture.
  4. In a casserole dish, dutch oven or baking dish, layer potato, beef, vegetables, topping with a final layer of potatoes.  So, the first layer will be potato, the next is beef, the next are veggies and all of that is topped with the other half of mashed potatoes.  Bake uncovered for 25 minutes.  Take out of oven, sprinkle cheese on top mashed potato layer and bake for an additional 20 minutes.  Serve hot on plates or in bowls.

My son was napping while we enjoyed this dish today.  Luckily, there’s plenty of this left for him too.  I’ve made a huge amount of this before, in a large, deep baking dish and we’ve had it for lunch or dinner two days in a row before.  It’s also easy to freeze, defrost and reheat in the oven if you were to make it and save it for later.

If you are going out to partake in the St. Patrick’s Day celebrations this weekend have fun and be safe!  As for me, I’ll be staying home with the children whipping up some festive treats in honor of the holiday.

Thanks for stopping by and don’t forget to cook, bake and eat life up!

Shepherd's Pie (4)

Shepherd’s Pie, An Irish/American Version

Cast Iron Breakfast Skillet

Breakfast Skillet

My mom was nice enough to keep the kids last night, which is much appreciated.  I miss them like crazy when they’re gone, but it’s nice to have some free time.  After all, they are home with me 24/7 for the most part (basically, since the day they were born), and I can tell they appreciate spending time away at times.  I woke up as early as I usually do, despite the fact that I could have slept in.  I’m programmed and there’s no turning back.

Instead of spending my morning making something quick and healthy for the kids for breakfast, I took the time (because I had the time) to make something I haven’t had in a while; A good breakfast skillet.  I love making breakfast skillets because anything goes, really.  You can throw in whatever you want and you don’t really need to follow a recipe so precisely (baking requires exact measurements).  The ingredients are so interchangeable.

There was a place down the street from my old place when I lived in the north suburbs of Illinois that served the best breakfast, and there was one breakfast skillet in particular that I ordered every single time I ate there.  It was incredible and since then, I’ve had an obsession with breakfast skillets, in general.

I think this is because when I eat most things, I always put a little of each part of a meal on my fork or spoon so I can taste everything together.  For example, if I’m having a meatloaf and mashed potato dinner, I’ll put some mashed potato on the fork and a piece of meatloaf and eat it off the fork together, in one bite.

Apparently, this process of eating is unusual to some.  I’ve known people who won’t even allow the items on their plate to touch, and would only eat one part of the meal at a time. First they will eat all of the mashed potatoes and then eat all of the meatloaf.

Kids have also asked me why I put more than one food on my fork at the same time.  “It all goes to the same place, so it doesn’t matter how you eat it”, I’d respond. =)  I just like to have that mouthful of different flavors in one small bite I guess.  This is why I believe I love a good skillet so much; Everything is cooked into the same dish and mixed together, promising a blend of several flavors and textures in each bite.

Breakfast Skillet 5

It was interesting when I recently discovered that Ryan had never had a skillet before.  No wonder he never wants to go out for breakfast (he hasn’t had a taste of all the great breakfast foods out there).  He claims he has never really been a “breakfast person”.  Actually, he usually either eats Pop Tarts, cereal, or pancakes for breakfast.  So, I had to make this skillet when I woke up today (while he took advantage of the kids’ absence and slept in).

Ingredients:

  • 2 large russet potatoes (diced into small cubes)
  • 1 lb ground beef
  • 2-3 cloves garlic, minced
  • freshly ground black pepper & salt to taste
  • 1 cup shredded cheese (cheddar, mozzarella, pepper jack – up to you)
  • 5 eggs (scrambled)
  • 1 white onion (diced)
  • 1 tbsp oil (vegetable, canola or olive)

Directions:

  1. Preheat oven to 350 degrees F.
  2. Heat a cast iron skillet over medium heat on the stove top.  After cast iron skillet is heated, add a tablespoon of oil.
  3. Add diced potatoes to pan and stir occasionally to make sure potatoes cook evenly.
  4. In the meantime, brown ground beef in a separate frying pan.  (I do this so I can drain the oil from the beef – otherwise I would cook the beef in the skillet as well, but I don’t like an overly greasy breakfast skillet.)
  5. With a wooden spoon, clear a space in the cast iron skillet, between the potatoes, and pour in egg to scramble.  Blend with potatoes.  Add your diced onions and minced garlic now.
  6. Add cooked ground beef to cast iron skillet over potatoes and eggs and mix together a bit.  Add your salt and pepper to taste and add shredded cheese.  Put the cast iron skillet in the oven for 15 minutes for cheese to melt and to completely soften potatoes.  Garnish with freshly chopped parsley leaves and serve hot.

Cast Iron Breakfast Skillet

We enjoyed this breakfast, and I just had to save some for the kids.  I think they’ll really enjoy it as well.  I’m also excited to make some other types/variations of breakfast skillet (I have a few tasty ideas in mind).  So, we’ll have that to look forward to.  Have a great Saturday everyone.

So Easy, Crock Pot Chili Mac

Chili MacYou can say that I’m your typical Chili lover.  I like classic-style chili best (not chili mac), but I have come up with several different variations in an attempt to please the family.  I wanted to make a chili everyone would love, especially my kids.  This hasn’t been easy, as everyone else seems to be terribly picky about chili.

I’ll start with the man.  Ryan told me he didn’t like chili, period.  I asked what it was that he didn’t like about it, because I had never met a man that didn’t like chili before.  Well, it was the beans.  So, simple solution – omit the beans.  Beans, no beans, doesn’t matter much to me, or the kids.  That one was pretty easy.

As for my daughter, she only likes Chili with elbow macaroni noodles in it, because it reminds her of mac and cheese, which is her favorite food in the world (aside from cookies and other sweets of course).  Okay, so that’s not a problem.  We’ll have Chili Mac then.  Pretty simple.  I can deal with Chili Mac when I get my Chili Crave.

But, the issues both the kids have about Chili is that it’s a bit too spicy for them.  I get that.  I don’t prefer spicy foods, but I can take the heat from a simple Chili.  The kids, on the other hand, cannot.  So, I had to find ways to subdue that mild spicy kick, without completely taking the “Chili flavor” away.  This is what I came up with.

Ingredients (serves 6):

  • 1 lb ground beef
  • 4 cups Multi-grain, elbow macaroni noodles
  • 1/4 cup brown sugar
  • 1 tsp ground cinnamon
  • 1 large can tomato soup
  • 2 cups water
  • 1 package Chili Seasoning

Directions:

  1. Turn Crock pot on to high heat.  Add 1 large can tomato soup, 2 cups of water, 4 cups of macaroni noodles and 1 package of Chili Seasoning.
  2. In a frying pan over medium heat, brown ground beef.  Add brown sugar and cinnamon to ground beef in frying pan and mix well.  Drain beef and add to Crock pot.
  3. Allow to simmer in Crock pot until noodles are soft.  Serve hot and enjoy with crackers, sour cream, shredded cheese…whatever your heart desires!

This Chili Mac still packs a mild chili flavor (along with that mild chili heat), but is graced with the presence of a little sweetness that really compliments the overall dish.  It’s perfect for the little picky eaters we know too well.

You can add more to this dish as well, and it would still be great.  I would have added a small diced onion, but I have tried that before and the children complained that the onions were too “spicy”.  What I did do though, was add a dash of fresh ground black pepper to my bowl, which was great.  It’s totally up to you.

As far as photographs go, today is a very dreary day.  We had a rain shower this morning, grass that is still partially covered in snow, and plenty of overcast causing gray skies.  Not exactly ideal weather for indoor photography.  I love the natural light best.  So, I’ll be staring out the window, hoping for sunny skies and warmer temps tomorrow.  We shall see. =)

Thanks for stopping by and don’t forget to cook, bake and eat life up!