Shepherd’s Pie, An Irish-American Version

Shepherd's Pie (5)

Shepherd’s Pie – Irish/American Version

About ten years or so ago, I threw together a type of casserole of sorts that included some of my favorite side dishes layered with ground beef.  I loved it.

As I mentioned in a previous post, I love food with layers and often eat separate parts of a meal in one bite, picking a little of each side up with the fork for a complete bite of everything.  Side dishes are usually made because each addition compliments the overall meal in some way, and I love tasting all of those flavors together.

So, when I made this dish some years ago, I was in layered food flavor Heaven.  I couldn’t get enough of this stuff.  Often times I change-up the recipe a bit and I’ve added some things specifically because my kids eat it up with those modifications.

Unbeknownst to me, the dish I had made was very similar to a traditional Irish dish called Shepherd’s Pie.  I hadn’t even heard of it before; Not until we had a dinner guest over who said, “This is a lot like Shepherd’s Pie”.  After some research, lo and behold, it was very similar, but you can say that I have taken that traditional Irish version and Americanized it a bit.

Shepherd's Pie

Shepherd’s Pie, An Irish/American Version

Now, being as how my last name is of Irish decent, meaning plenty of my Ancestors were straight from Ireland, you would think I would have known about this dish.  However, so much time has passed that many of us don’t know everything about the authentic dishes enjoyed by our ancestors.

I like to think that it was some internal part of me, related to my ancestry, that beckoned me to create such a dish without the knowledge of its prior existence and formulation.  Perhaps this is why I love this dish so much, especially with the Americanized modifications I have made and continue to make.

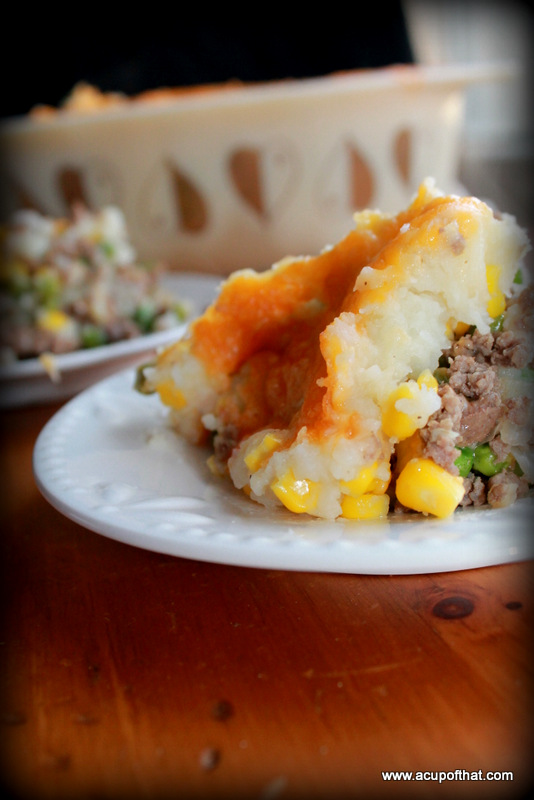
Such as the addition of cheese for example.  Now, no one really knows when, how, who or where cheese-making began, but what we do know is that cheese, in general, and cheese-making, became BIG Business in America during the 19th century (putting Wisconsin on the map).  Although cheese is loved by many and used in dishes all over the world, I tend to think of our big American brands when I think of cheese, which is why I say this is sort of a reinvention of the traditional Irish version of this dish because it has some American flair (or components).

Another addition that I consider more American is the corn.  The traditional Irish dish uses carrots. Now, my home state is Indiana.  Indiana Beach has this commercial that has a big cartoon Crow stating, “There’s more than corn in Indiana.”  Of course, their “more than corn in Indiana” means that there’s also Indiana Beach, but we can’t deny that while traveling through Indiana, the scenery will include a lot of cornfields.  So, there is more than corn in Indiana.  There’s Indiana Beach and my Shepherd’s Pie with corn.

Shepherd's Pie (6)

Shepherd’s Pie, An Irish/American Version

Ingredients (serves 6):

  • 1-2 lbs ground beef
  • 1 tablespoon Worcestershire sauce
  • 2 cloves garlic (minced)
  • 1 small onion, diced
  • 8 russet potatoes, peeled and mashed
  • 1 small bag frozen peas (or two cans)
  • 1 small bag frozen corn (or two cans)
  • 2 cups of cheese (I used the Kraft fancy blend of mozzarella and cheddar)
  • salt and pepper to taste
  • 1/2 stick butter for potatoes
  • 1 cup milk for potatoes

Directions:

  1. Fill a large pot halfway full of water and bring to a boil (over medium to medium-high heat). Peel potatoes and cut them smaller chunks.  Add to pot of boiling water and cook until tender (about 25 minutes).  Drain and mash the potatoes with potato masher when cooked and add butter and milk. Stir until blended and creamy. Set aside until beef is done.
  2. In the meantime, preheat oven to 375 degrees F.
  3. Brown beef in a skillet or frying pan.  Add chopped onions and minced garlic to beef as it cooks.  Add Worcester sauce to help flavor the beef. Drain excess oil from beef mixture.
  4. In a casserole dish, dutch oven or baking dish, layer potato, beef, vegetables, topping with a final layer of potatoes.  So, the first layer will be potato, the next is beef, the next are veggies and all of that is topped with the other half of mashed potatoes.  Bake uncovered for 25 minutes.  Take out of oven, sprinkle cheese on top mashed potato layer and bake for an additional 20 minutes.  Serve hot on plates or in bowls.

My son was napping while we enjoyed this dish today.  Luckily, there’s plenty of this left for him too.  I’ve made a huge amount of this before, in a large, deep baking dish and we’ve had it for lunch or dinner two days in a row before.  It’s also easy to freeze, defrost and reheat in the oven if you were to make it and save it for later.

If you are going out to partake in the St. Patrick’s Day celebrations this weekend have fun and be safe!  As for me, I’ll be staying home with the children whipping up some festive treats in honor of the holiday.

Thanks for stopping by and don’t forget to cook, bake and eat life up!

Shepherd's Pie (4)

Shepherd’s Pie, An Irish/American Version

Creamy Spinach & Artichoke Dip

spinich artichoke dip

Creamy Spinach & Artichoke Dip

I’ve been craving some sort of tasty dip for a while now.  Usually, the only time I get the chance to enjoy a great dip is as an appetizer while dining out or at a special event, such as a party.  But, there is no reason one needs a special occasion to make a tasty dip at home.  So, I went for it, and the whole family was glad I did.

spinach dip

Creamy Spinach Artichoke Dip

My daughter was pretty interested in the Artichoke Hearts.  Like many kids, the sight of certain greens produces a declaration of dislike almost immediately.  While she’s very good about eating fruits and vegetables, some of the vegetables that are unfamiliar to her don’t even stand a chance.  But, there’s something I do that helps coax her into not only trying these new fruits or veggies, but learn to love them.  I get her involved in the making of a dish.

Spinach Artichoke Dip (4)

Creamy Spinach Artichoke Dip

Since this dish is so simple to put together, it was very easy to allow her to take over the entire making of this.  Of course, I dealt with the parts of the process that included the hot oven and the mincing or chopping of ingredients.

I measured out all the ingredients and placed them on the counter.  The baking dish was already there so all she had to do was take all the ingredients and add them to the baking dish and stir to blend them together.

Spinach Artichoke Dip (6)

Creamy Spinach Artichoke Dip

Aside from the obvious advantage of allowing her to get involved and spend time helping mommy make things to feed the family, she felt like she had a major role in creating this dish; And therefore, was more open to trying the final product.  How could she refuse to taste something she herself, had a part in making?  It works like a charm.

Spinach Artichoke Dip (7)

Creamy Spinach Artichoke Dip

So, what started as a little girl, standing on her tippy toes asking, what’s that, what’s this and stating she didn’t like those things, later became a little girl who was proud of her creation and felt she needed to prove how great it was by eating it.  The thing about many kids is, they won’t even give certain foods a try before they claim utter dislike for them.  This truly is an effective way to get them to at least try new foods, especially the green things.

spinach artichoke ip

Creamy Spinach Artichoke Dip

You would suspect this dish would take longer, or be more difficult to make then it actually is because it’s a staple appetizer in many restaurants… and because it’s so delicious.  That’s not the case, at all.  It was so incredibly easy to make!

Another great thing about this recipe is that ingredient amounts can be modified to your specific liking.

I prefer the dip with plenty of spinach and a lot of cheesy goodness.  Others appreciate the creaminess more.  Just so you know, this recipe has the best of both worlds in regards to creaminess and spinach galore.

The bread can be toasted if you like it crispy.  I left mine alone because I wanted that soft, doughy texture with the creaminess of the dip.  I considered making the french bread from scratch because I had all the right ingredients, but we had to be somewhere later that day and I didn’t have the time.  I also considered seasoning the bread, but felt that in this case, simple bread was best because the dip was so full of flavor already, that I didn’t want to send my taste buds into a taste overload (if that’s even possible).

Ingredients:

  • 1 10 ounce bag frozen chopped spinach (thawed)
  • 3 cloves, freshly minced garlic
  • 1 14 ounce can artichoke hearts, chopped and drained
  • 1 cup cream cheese, softened
  • 1/4 cup milk
  • 1 cup Parmesan cheese
  • 1 cup mozzarella cheese
  • 1/2 cup sour cream

Directions:

  1. Preheat oven to 375 degrees F.
  2. Chop artichoke hearts and mince garlic and add to baking dish.
  3. Add the rest of the ingredients and mix together until mixture is blended well.
  4. Bake for 30 minutes.  Serve with bread or chips (pita chips work well also).
spinach dip

Spinach Artichoke Dip

How simple was that?  If I were in the mood for a little hint of spice I would have simply added a bit of pepper jack cheese, but I’ll save that for an occasion that involves more members of my spice-loving family.  I’m probably the only one of the bunch that can’t take the heat.

It’s been a long week and the weekend is nearing once again.  Thanks for stopping by to visit me and I hope you come again!

Have a great weekend!

So Easy, Crock Pot Chili Mac

Chili MacYou can say that I’m your typical Chili lover.  I like classic-style chili best (not chili mac), but I have come up with several different variations in an attempt to please the family.  I wanted to make a chili everyone would love, especially my kids.  This hasn’t been easy, as everyone else seems to be terribly picky about chili.

I’ll start with the man.  Ryan told me he didn’t like chili, period.  I asked what it was that he didn’t like about it, because I had never met a man that didn’t like chili before.  Well, it was the beans.  So, simple solution – omit the beans.  Beans, no beans, doesn’t matter much to me, or the kids.  That one was pretty easy.

As for my daughter, she only likes Chili with elbow macaroni noodles in it, because it reminds her of mac and cheese, which is her favorite food in the world (aside from cookies and other sweets of course).  Okay, so that’s not a problem.  We’ll have Chili Mac then.  Pretty simple.  I can deal with Chili Mac when I get my Chili Crave.

But, the issues both the kids have about Chili is that it’s a bit too spicy for them.  I get that.  I don’t prefer spicy foods, but I can take the heat from a simple Chili.  The kids, on the other hand, cannot.  So, I had to find ways to subdue that mild spicy kick, without completely taking the “Chili flavor” away.  This is what I came up with.

Ingredients (serves 6):

  • 1 lb ground beef
  • 4 cups Multi-grain, elbow macaroni noodles
  • 1/4 cup brown sugar
  • 1 tsp ground cinnamon
  • 1 large can tomato soup
  • 2 cups water
  • 1 package Chili Seasoning

Directions:

  1. Turn Crock pot on to high heat.  Add 1 large can tomato soup, 2 cups of water, 4 cups of macaroni noodles and 1 package of Chili Seasoning.
  2. In a frying pan over medium heat, brown ground beef.  Add brown sugar and cinnamon to ground beef in frying pan and mix well.  Drain beef and add to Crock pot.
  3. Allow to simmer in Crock pot until noodles are soft.  Serve hot and enjoy with crackers, sour cream, shredded cheese…whatever your heart desires!

This Chili Mac still packs a mild chili flavor (along with that mild chili heat), but is graced with the presence of a little sweetness that really compliments the overall dish.  It’s perfect for the little picky eaters we know too well.

You can add more to this dish as well, and it would still be great.  I would have added a small diced onion, but I have tried that before and the children complained that the onions were too “spicy”.  What I did do though, was add a dash of fresh ground black pepper to my bowl, which was great.  It’s totally up to you.

As far as photographs go, today is a very dreary day.  We had a rain shower this morning, grass that is still partially covered in snow, and plenty of overcast causing gray skies.  Not exactly ideal weather for indoor photography.  I love the natural light best.  So, I’ll be staring out the window, hoping for sunny skies and warmer temps tomorrow.  We shall see. =)

Thanks for stopping by and don’t forget to cook, bake and eat life up!

Linguine & Lemon Shrimp Scampi

In need of a great pasta dish?  We were, and this dish certainly did the trick.  This recipe can also be found in my “Edible Love” post, but I wanted to separate it to make it easier for those who need a good pasta dish recipe.

Linguine & Lemon Shrimp Scampi

Linguine

Ingredients: 

  • 2 lemons (zested & squeezed)
  • 1 teaspoon red crushed pepper
  • 5 tablespoons olive oil
  • 6 garlic cloves (minced)
  • 1 bag frozen shrimp (you can use fresh shrimp as well)
  • 1 small onion
  • 1 box of thin linguine noodles
  • 2 tablespoons butter
  • 2-3 cups freshly chopped parsley
  • salt and pepper to taste

Lemon Parsley SpoonDirections:

  1. Zest 1 whole lemon, cut it in half and squeeze the juice into a medium-sized bowl (watch out for those lemon seeds though!).  Mince your 6 cloves of garlic and add it to this bowl as well, along with red pepper flakes, olive oil, and salt and pepper (to taste).
  2. Take the tail shells off the shrimp and set aside (you will be using these tail shells for the stock.) Add your shrimp to this mixture, mix well to coat shrimp and set entire bowl, containing contents, aside to soak in that zesty marinade.
  3. Place a small pot over medium heat.  Cut up a small onion.  Add shrimp tail shells and onion to pot and pour in 2 cups of water.  Bring to a boil, then reduce and let simmer for 20 minutes.
  4. In the meantime, heat up a big pot of water with plenty of salt, bringing it to a rapid boil for the pasta.  Cook pasta until it’s tender (but not fully cooked).  After pasta is cooked, scoop 1 cup of pasta water out and set it aside.  Strain pasta and set aside.
  5. Take a strainer over a bowl and pour shells and onion into strainer, reserving the sauce (or stock/juices).  Throw the shells and onion away. You won’t need them.
  6. Heat a skillet to medium high heat.  Scoop in the shrimp, but reserve the marinade for later.  Cook shrimp until it’s pink.  You’ll notice a sauce will start to form and caramelize in the pan.  Cook for about 4 minutes.  Remove shrimp from pan and set aside, but keep pan on heat with the liquid left in the pan after shrimp removal.
  7. Add the marinade from the bowl to the hot skillet and cook for 3 minutes.  Add your bowl of shrimp stock (the liquid from the shells and onion you set aside earlier.)  Add the cup of pasta water you reserved as well.
  8. Zest your 2nd lemon and add the zest to the pan.  Cut lemon in half and squeeze all the lemon juice into the pan as well (watch out for those seeds).  Add your chopped parsley now too. Add salt and pepper to taste.  Reduce heat and let this sauce simmer for about 10 minutes.
  9. Add shrimp and pasta to the sauce in the pan and mix it all into the liquid sauce that is in the pan.
  10. Pour contents of pan into a serving dish and serve immediately.

Shrimp on a ForkYou’re all set to eat this ridiculously good shrimp pasta now.  This dish is amazing! The pasta, parsley, shrimp stock, and lemon zest pair together to create the perfect marriage of ingredients in one big bowl.  The overall dish boasts so much zest and flavor, your taste buds will thank you.  It is definitely worth the time.

Thanks for stopping by. It was nice to see you again!

Eggs Benedict

Eggs Benedict

Recipe Challenge #1:  Eggs Benedict

I was challenged to make Eggs Benedict by our recipe challenge winner, Kelly Snyder.  It was a little nerve-racking, as I had never made this before, but I was surprisingly happy with the results.  So, I am very pleased to announce that I did it!

The thing I was most nervous about was poaching the eggs, however, this process turned out to be easier than I thought it would be.  Want to know what actually turned out to be the hardest part of this for me?  Making the Hollandaise Sauce.  That is only because my arms got tired of holding a stainless steel bowl over a boiling saucepan of water and whisking, vigorously, for what seemed like an eternity.  I would recommend using a double boiler if you have one, but I didn’t so I had to do things the hard way (typical).

This was a tasty breakfast and I’m pretty proud of myself for pulling it off, as it is one of my favorite breakfast foods in the world.

Eggs Benedict & Hollandaise

Ingredients for Hollandaise Sauce (time 20 minutes, yields 1 cup): 

  • 4 large egg yolks
  • 1/2 cup unsalted butter, melted
  • 1 tbsp lemon juice
  • 1 pinch cayenne
  • 1 pinch paprika
  • 1 pinch salt

Directions for Hollandaise Sauce:

  1. Boil 3 cups water in a sauce pan over medium heat (water should be barely boiling and bubbling).
  2. In a stainless steel bowl, add 4 egg yolks and lemon juice and whisk well until mixture has thickened and doubled.
  3. Hold stainless steel bowl over the saucepan of boiling water, being careful not to touch the bowl to the water, and whisk vigorously and consistently until mixture has thickened and doubled.
  4. Drizzle in butter slowly while bowl is over heat and continue to whisk, vigorously.  Be careful not to get mixture too hot, so eggs don’t begin to scramble. (You will likely be whisking mixture over boiling water for 10-15 minutes to gain appropriate consistency.)
  5. After sauce has thickened and appears to have doubled, remove from heat and add cayenne, paprika, and salt.  Whisk well.  Cover and set aside at room temperature.

Ingredients for Eggs Benedict (yields 4):

  • 2 English Muffins (split into halves to make 4)
  • 4 eggs
  • 1 tablespoon white vinegar
  • 4-8 slices of Canadian Bacon (I used 8 slices because I put two slices on each muffin)
  • finely chopped fresh parsley to garnish (optional)

Directions for Eggs Benedict:

  1. In a frying pan, brown Canadian Bacon.
  2. While Canadian Bacon is browning, toast or bake English Muffins until they are slightly crisp around edges or slightly browned (until they are toasted).
  3. Using the same saucepan you heated the Hollandaise Sauce over, add 1 tablespoon white vinegar and make sure water is heated to a somewhat rapid boil.
  4. Carefully break and drop eggs into saucepan of boiling water, one egg at a time.
  5. Boil each egg for about 3-4 minutes, so remember to take the eggs out in the same order they were put in.
  6. Using a slated spoon carefully take them out, one at a time, and hold each over pan to allow excess water to drain.  I actually used a stainless steel potato masher to take each egg out instead of a slated spoon because it was bigger and had enough of a bend to ensure the egg wouldn’t fall out as I let the excess water drain.  (It worked well!)
  7. Set the English Muffins on a dish, add slices of Canadian Bacon.  Place the poached eggs on top of the Bacon.  Top with Hollandaise Sauce and parsley.

That’s it!  You’re ready to enjoy this wonderful breakfast now.  This is definitely something I would not make every day, as it is quite a process (especially when you’re starving in the morning), but it’s definitely good to know that it can be made at home, regardless.

eggs benedict

Thank you for stopping by.  I hope you give this recipe a try at home.  As long as you are good at multitasking, the steps required for creating this dish will flow smoothly.  Most importantly, it’s totally worth it!

I can’t wait to see what next month’s Recipe Challenge winner has in store for me.  I hope to see you again soon, and don’t forget to cook, bake and eat life up!